


Table of contents
- Learning Objectives
- What is Hardhat!
- Why is Hardhat Needed?
- Ethereum Development Environments
- Hardhat Runner
- What is Unit Testing
- Installing Node.js
- Initialise Node.js Project
- Installing Hardhat
- Sample Smart Contract
- Compiling Smart Contract
- Installing Plugins
- Create Empty Test Script
- Deployment Tests
- Testing the Transfer Functionality - Basics
In this blog, we’ll cover the fundamentals of Hardhat, a development environment for Ethereum software. It consists of different components for editing, compiling, debugging and deploying your smart contracts and dApps, all of which work together to create a complete development environment. We’ll go through what Hardhat is and the benefits that it brings to a project. We’ll also cover the different components that make up the Hardhat framework, as well as provide an overview of how a typical Hardhat project is set up, then test smart contracts.
Learning Objectives
Describe what Hardhat is
Explain the benefits of using a development environment for an Ethereum project
Explain the different components that makeup Hardhat, such as Runners, Tasks, Plugins etc.
Initialize a scaffold Hardhat project
Describe what unit tests are
Compile smart contracts using Hardhat
Write unit tests using Hardhat
What is Hardhat!
Hardhat is a development environment for Ethereum software. It consists of different components for editing, compiling, debugging and deploying your smart contracts and dApps, all of which work together to create a complete development environment.
Hardhat also comes built-in with Hardhat Network, a local Ethereum network designed for development. It allows you to deploy your contracts, run your tests and debug your code.
Why is Hardhat Needed?
Earlier, we mentioned the term “development environment”, but what does that mean? as a blockchain developer, you should be very familiar with Remix IDE. Remix is another example of a development environment! Recall that Remix is referred to as an IDE (Integrated Development Environment).
So why use Hardhat instead of Remix? Remix is great for quickly spinning up smart contracts and deploying them to a sandbox blockchain in the browser. However, it lacks certain features that are required for building projects on a larger scale. This is where more powerful development environments, like Hardhat, come in.
Ethereum Development Environments
As with most things in coding, there is often more than 1 framework available that developers can choose from to achieve the same outcome. Development environments for Ethereum software are no exception. The following are some other alternatives to Hardhat.
Truffle - One of the first development environments to come out for Ethereum, it has a large community behind it.
Brownie - Python-based development environment.
Embark - Similar to Hardhat, it is another Node-js package.
Among the development environments listed, Hardhat and Truffle are the 2 most commonly used, so most web3 developers pick from one of the two. Where Hardhat shines compared to Truffle is that it is a newer player in the market, so the workflow of Hardhat is more flexible and streamlined.
Watch this video if you’re interested in finding out more about the differences between these two frameworks.
Hardhat Runner
Enough talk about the other frameworks, let’s focus on Hardhat! Hardhat Runner is the main component you interact with when using Hardhat. It's a flexible and extensible task runner that helps you manage and automate the recurring tasks inherent to developing smart contracts and dApps.
Hardhat Runner is designed around the concepts of tasks and plugins.
Tasks - Every time you're running Hardhat from the command line, you're running a task (we’ll see this later). For example, npx hardhat compile runs the built-in compile task. Tasks can call other tasks, allowing for complex workflows to be defined. Users and plugins can override existing tasks, making those workflows customizable and extendable.
Plugins - This is the backbone of Hardhat. Plugins are libraries and other tools you install and include in your Hardhat project as and when specific functionalities are required. Think of these as reusable pieces of code that can be included to add extra functionality on top of the basic Hardhat. There are official plugins like ethers and web3 (we’ll cover them later) and also community-created ones. View the list of plugins available here. You can create your plugin and use it for your own projects too!.
What is Unit Testing
Unit testing is a software development process in which the smallest portions of codes that can be tested, known as Units, are individually tested to check if they perform as intended.
Unit testing is crucial because it can help detect flaws early on in the development process before the project gets too big. The size of the project can make it hard to detect exactly which portions of the code are responsible for causing the errors.
Each unit is tested independently in an isolated environment to ensure a lack of dependencies in the code. We can use the Hardhat framework along with some other dependencies to carry out unit testing for our smart contracts.
Installing Node.js
Hardhat (like most Ethereum libraries and tools) is written in Javascript. Hence we’ll need to install Node.js before we begin. Refer to this guide for how to download it.
Initialise Node.js Project
Open your terminal and create a new directory, let’s call it gbr-hardhat-campaign. Let’s also change the directory of our terminal to enter the directory. Run the 2 commands below separately in your terminal.
mkdir gbr-hardhat-campaign

cd gbr-hardhat-campaign
Now let’s initialise a Node.js project. Run the command below in your terminal. After doing so, you’ll see a new package.json file in your directory.
npm init --yes
Basically, package.json is a JSON file that exists at the root of a Javascript/Node project. It holds metadata relevant to the project and it is used for managing the project’s dependencies, scripts, version and a whole lot more.
If you open it now, you’ll see that there are no names of any libraries in it. This makes sense because we only just initialized an empty Node.js project.
Installing Hardhat
Time to install Hardhat into our Node.js project. We can do so by running the command below in our terminal.
npm install --save-dev hardhat
If you open package.json now, you’ll see that hardhat has been added under devDependencies. You’ll also realise that there is now the node_modules directory and package-lock.json in your directory.
We won’t dwell too much on those since they’re Node.Js concepts, but if you’re interested in finding out more, you can read more about node_modules here and package-lock.json here.
Sample Smart Contract
Let’s start by creating a file called Token.sol inside a new folder called contracts. Once you’ve done that, run the 2 commands below directory in your terminal to create the contracts folder and the Token.sol contract in the new folder.
mkdir contracts
touch contracts/Token.sol
Copy the code from ‘Working code’ into Token.sol
pragma solidity ^0.8.0;

contract Token {
  string public name = GBR Token';
  string public symbol = 'GBR';

  uint public totalSupply = 10000000;
  address public owner;

  mapping(address => uint) balances;

  constructor() {
    balances[msg.sender] = totalSupply;
    owner = msg.sender;
  }

  function transfer(address to, uint amount) external {
    require(balances[msg.sender] >= amount, 'not enough tokens');
    balances[msg.sender] -= amount;
    balances[to] += amount;
  }

  function balanceOf(address account) external view returns(uint) {
    return balances[account];
  }
}
Since this topic is focused on Hardhat, we won’t spend too much time going over the details of this smart contract. Here’s a summary of the logic of this smart contract.
Token.sol implements a token that can be transferred
There is a fixed total supply of tokens that can't be changed - totalSupply
The entire supply is assigned to the address that deploys the contract - owner & constructor()
Anyone can receive tokens, the balances are recorded - balances
Anyone with at least one token can transfer tokens - transfer()
The balance of token holders can be retrieved - balanceOf()
Compiling Smart Contract
Now that our smart contract is completed, we need to compile it. If you need a refresher on what compiling is - compiling essentially converts human-readable programming language (like Solidity) into machine-readable language (1s and 0s).
To compile the contract, run the command below in your terminal. Remember earlier when we talked about Tasks being one of the core concepts of Hardhat? The compile task is one of those built-in tasks. If you’ve successfully compiled the contract, your terminal will output the message “Compiled 1 Solidity file successfully”.
npx hardhat compile
After compiling a smart contract, you’ll get the contract’s Application Binary Interface (ABI). Essentially, ABI is the standard way to interact with contracts in the Ethereum ecosystem, both from outside the blockchain and for contract-to-contract interaction. Read more about ABI here.
If you look at the project directory now, you’ll see that there are 2 new folders now - artifacts and cache. If you’re curious, you can inspect the ABI of Token.sol by looking at the file artifacts/contracts/Token.sol/Token.json.
Installing Plugins
Before we proceed with writing the unit tests for our smart contract, we need to install some plugins.
Recall - Plugins is the other core concept of Hardhat (alongside tasks), plugins are used to add on additional functionality to the base layer of Hardhat.
Here we’ll be installing 2 plugins - hardhat-ethers and hardhat-chai-matchers. Run the command below in your terminal to do so. Ethers.js is a library that facilitates interaction with the Ethereum blockchain. Chai is a testing library that’s used in many Javascript projects; it is not specific to blockchain.
npm install --save-dev @nomiclabs/hardhat-ethers ethers @nomicfoundation/hardhat-chai-matchers
Now let's modify the Hardhat configuration file to include our plugins. Open hardhat.config.js and replace the content with the code. We’re adding in two require statements here.
/** @type import('hardhat/config').HardhatUserConfig */
require("@nomicfoundation/hardhat-chai-matchers");
require("@nomiclabs/hardhat-ethers");
module.exports = {
 solidity: "0.8.9",
};
Create Empty Test Script
Alright, now we can finally begin the fun part - writing the tests.
We’ll be writing our tests in a script called Token.js in a new folder we’ll be creating called test. Note that this is a Javascript file, not a Solidity file.
Run the 2 commands below separately in your terminal to create an empty folder and initialise an empty Javascript file inside the folder.
mkdir test
touch test/Token.js
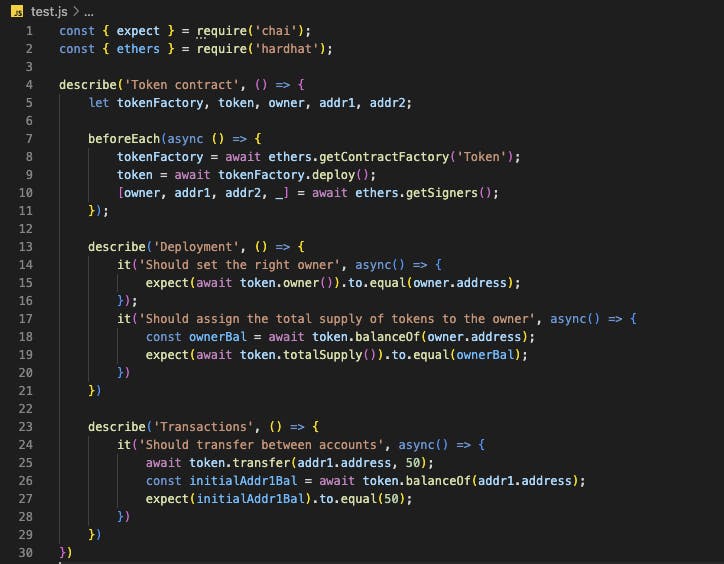
Initialisation & beforeEach()
const { expect } = require('chai');
const { ethers } = require('hardhat');

describe('Token contract', () => {
  let tokenFactory, token, owner, addr1, addr2;

  beforeEach(async () => {
    tokenFactory = await ethers.getContractFactory('Token');
    token = await tokenFactory.deploy();
    [owner, addr1, addr2, _] = await ethers.getSigners();
  });

  describe('Deployment', () => {
    it('Should set the right owner', async() => {
      expect(await token.owner()).to.equal(owner.address);
    });
    it('Should assign the total supply of tokens to the owner', async() => {
      const ownerBal = await token.balanceOf(owner.address);
      expect(await token.totalSupply()).to.equal(ownerBal);
    })
  })
})
Copy the code above and paste it into Token.js.
Any code inside beforeEach() runs before each test is conducted. Each test is defined with an it() block.
A ContractFactory in ethers.js is an abstraction used to deploy new smart contracts, so tokenFactory is a factory of instances of the Token contract. Think of tokenFactory as the blueprint of the Token contract, with it you can deploy as many Token contracts as you want.
Now that we have the blueprint, we need to actually deploy an instance of the Token contract. We do so by calling .deploy() on the blueprint (tokenFactory), and we store this in the variable token.
A Signer in ethers.js is an object that represents an Ethereum account. It's used to send transactions to contracts and other accounts. Here we're getting a list of the accounts in the Hardhat Network (the local Ethereum blockchain for development), saving the first account as owner, the second account as addr1 and the third account as addr2.
Overall, this beforeEach() block of code will deploy the Token.sol contract each time before each test block is run.
Deployment Tests
describe('Deployment', () => {
    it('Should set the right owner', async() => {
      expect(await token.owner()).to.equal(owner.address);
    });

    it('Should assign the total supply of tokens to the owner', async() => {
      const ownerBal = await token.balanceOf(owner.address);
      expect(await token.totalSupply()).to.equal(ownerBal);
    })
Each test is defined with an it() block. Coupled with the beforeEach() block, what the test script will be doing at a high-level is this:
beforeEach()→ deploy SCit(’Should set the right owner’) → run first test
beforeEach()→ deploy SC againit(’Should assign the total supply of tokens to the owner’) → run second test
For the first test, we’re checking if the contract assigned the owner variable (defined in Token.sol) to the address that deployed the contract, as is defined in the constructor() of Token.sol. In other words, the contract “should set the right owner”, as is the name we assigned for this test. You should always give your tests intuitive names like this so that it is easily understood, this is especially important if you have a bigger project which will result in numerous tests.
The test checks if token.owner(), the owner variable stored in the contract we deployed in beforeEach(), is equal owner.address, the address of the first account in the Hardhat Network. In layman terms, the test expects that token.owner() should be equal to owner.address. Again, it is intuitive like that.
The second test checks if the total supply of tokens are assigned to the owner (as is defined in the constructor() of Token.sol. Since balanceOf() is an external function in Token.sol, we can call it with dot (.) notation.
If you open up Token.sol and take a look at the balanceOf() function, you’ll see that it takes in 1 argument, an address. Hence, here we pass in the address of the owner and store the balance of the owner’s address in the variable ownerBal. Then, similar to what we did in the first test, we check if the total supply of the tokens token.totalSupply() is equal to ownerBal.
Describe(), async() & await
Now if you are following up you will notice that there’s a few miscellaneous pieces of code that we haven’t addressed yet.
Firstly, what is describe()? Basically, describe() provides some structure to your test script. it() identifies each individual test, whereas describe() identifies a segment of individual tests. describe() doesn’t really do anything technically, but think of it as paragraphs for your code. For example, here we have 2 tests that pertains to the deployment of the contract, hence we aptly named the description as ‘Deployment’.
The other pieces of code we haven’t addressed are async() and await. Just think of them as this: when you’re interacting with the blockchain, it will take some time for the transaction to get through to the blockchain, hence in your code, you will need to await the response from the blockchain before proceeding with the other lines of code.
Running the Tests
Time to run the tests, we do so by running a Hardhat Task. Run the code below in your terminal.
npx hardhat test
Testing the Transfer Functionality - Basics
Time to add more tests! This time, let’s write tests for the transfer functionality. Add the code below to Token.js
describe('Transactions', () => {
    it('Should transfer between accounts', async() => {
      await token.transfer(addr1.address, 50);
      const initialAddr1Bal = await token.balanceOf(addr1.address);
      expect(initialAddr1Bal).to.equal(50);
    })
  })
Refer to the image below if you are unsure of where to add it in.
Since we’re writing tests for transactions instead of deployment this time, we create a new describe() block and name it ‘Transactions’.
The first test we’ll check for in the Transactions block is to check if the transfer() function of Token.sol behaves as expected. If you open Token.sol, you’ll see that the transfer() function takes in 2 arguments - 1/ the recipient’s address and 2/ the amount of tokens to transfer.
Here we’re transferring 50 tokens from the owner to addr1. Similar to what we did in the test earlier on, we call the balanceOf() function and store the balance of addr1 in initialAddr1Bal. We then check that the balance equals to 50.
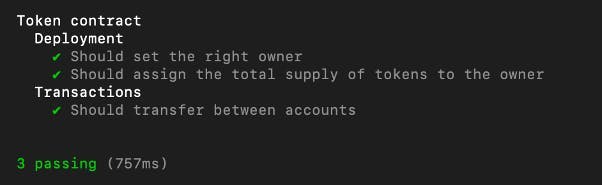
Let’s run the test again! Let’s run the same command in our terminal as we did in the previous step.
npx hardhat test
You should get an output similar to the image.

Testing the Transfer Functionality - Specify Caller
Now let’s expand on this test - let’s transfer tokens from addr1 to addr2. Add on to the test such that it looks like the code below
describe('Transactions', () => {
    it('Should transfer between accounts', async() => {
      await token.transfer(addr1.address, 50);
      const initialAddr1Bal = await token.balanceOf(addr1.address);
      expect(initialAddr1Bal).to.equal(50);

      await token.connect(addr1).transfer(addr2.address, 20);
      const addr2Bal = await token.balanceOf(addr2.address);
      expect(addr2Bal).to.equal(20);

      const finalAddr1Bal = await token.balanceOf(addr1.address);
      expect(finalAddr1Bal).to.equal(initialAddr1Bal - 20);
    })
  })
Here we’re transferring 20 tokens from addr1 to addr2. Note that we use the .connect(). syntax to specify which account we’re using to call functions. If nothing is specified, the default is set to the first account in the list of accounts taken from the Hardhat Network. We then get the balance of addr2, and check that it equals to 20 tokens. We get the balance of addr1 again and store it in finalAddr1Bal. We then check to see if the final balance of addr1 equals to the initial amount minus the amount sent out to addr2.
Run npx hardhat test command in your terminal again
you should get an output similar to the image below
Testing the Transfer Functionality - Negative Case Test
We’ll go through 1 last test that’s commonly used in Hardhat - the negative case test. Besides testing if your smart contracts work in the positive cases as expected, you must also check if your smart contract throws errors when it is expected to.
Add the code below to the Transactions block.
it('Should fail if sender doesnt have enough tokens', async() => {
      const initialOwnerBal = await token.balanceOf(owner.address);

      await expect(token.connect(addr1).transfer(addr2.address, 10)).to.be.revertedWith('not enough tokens');
      expect(await token.balanceOf(owner.address)).to.equal(initialOwnerBal);
    })
This test will check if our smart contract correctly prevents the Transfer() function from being called if the balance of the address is insufficient. We first store the balance of the owner in initialOwnerBal, which should be the entirety of the token supply (1,000,000). Recall that the contract gets re-deployed after each test (as declared in the beforeEach() function), so whatever occured in the previous tests are now discarded.
We then attempt to transfer 10 tokens from addr1 to addr2. However, the transfer() function will rightfully be returned with an error since the balance of addr1 is 0. More specifically, if you look at the transfer() function in Token.sol, the error message that will be returned is ‘not enough tokens’.
Lastly, we check to see if the balance of owner after the failed transaction is equal to his starting balance, which is stored in the variable initialOwnerBal.
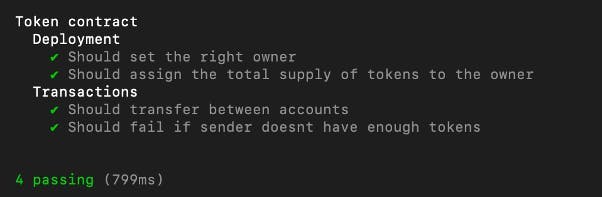
Run the npx hardhat test command in your terminal
you should see an output similar to the image below
we have come to the end of the lesson, you could try it out. also drop a review and comment.