Introduction To Test Driven Development With Jest


Introduction
Jest is one of the many Javascript Testing Frameworks that are available and we are using it primarily for its clean syntax and its ability to be integrated into frontend frameworks such as React. Mocha and Chai are two other frameworks that exist but they are not as simple to configure as Jest.
Learning Objectives
Write basic unit tests using Jest
Implement the TDD workflow
Step 1: Install Jest
In this article, we will install Jest through npm, which is the fastest method to start using Jest from scratch. However, before starting the installation we first need to have Node.js installed!
Head over here to install Node.js on your terminal if you do not already have Node installed. To check if you have successfully installed Node.js on your terminal, run the following command and if a Node version is returned, it indicates that you have successfully installed Node.js as shown below!
node -v
With Node.js successfully installed, we will next initialize a project for us to start writing unit tests with Jest!
First, we will create a new project folder and navigate to the project directory by running the following code.
mkdir intro_tdd_jest
cd intro_tdd_jest
Next, we will initialize a project under the newly created project folder by running the following command. You should observe the following output as shown below.
npm init -y
Next, proceed to open the project folder with your IDE where we will next install the Jest library dependency!
On your IDE’s terminal, run the following command to install Jest!
npm install --save-dev jest
With Jest successfully installed, we are now ready to start writing unit tests!
Step 2: Write Basic Test Cases with Jest
To begin, let’s start with something simple where we will be writing a test for a function that takes in a number and returns an array of numbers counting up from 1 to that number.
Start by creating a myfunction.js file and a myfunction.test.js file under the root directory!
We will begin writing the tests first where there will be 2 tests namely:
Check that length of array matches input number
Check that array to contains the element 1
Proceed to copy the following code snippet to the myfunction.test.js file.
const myfunction = require("./myfunction");

test("checks length of array", () => {
 expect(myfunction(5).length).toBe(5);
});
test("checks if 1 in array", () => {
 expect(myfunction(5)).toContain(1);
});
n this code snippet, we used the toBe and the toContain methods from the Jest library to perform the 2 checks listed above!
toBe allows us to check the value of a singular element in the array whereas toContain lets us check if the array contains a certain value.
There are many more methods available for us to use and you can access these methods over at the Jest Documentation section!
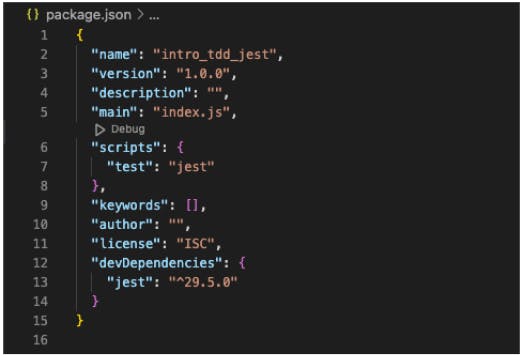
Next, proceed to add the following code snippets to your package.json file to replace the existing scripts variable.
"scripts": {
  "test": "jest"
 },
Your package.json should look like the following.
Lastly, proceed to copy the following code snippet to the myfunction.js file.
function myfunction(a) {
  var list = [];
  for (var i = 1; i <= a; i++) {
  list.push(i);
  }
  return list;
 }
 module.exports = myfunction;
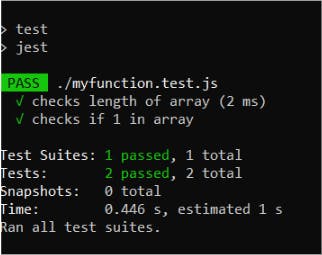
Next, proceed to run the command below to test the new function!
npm run test
Jest should now render that the test cases have all passed as shown below!
Now that you have written your first test case in Jest, we will next explore how to integrate Jest with React components in my next article.
Follow, Like and share if this article was useful to you.