

How to Build a Blog App with Flask
A guide to building a cool blog app using the flask framework.


Hello There 🖐
Flask is a well-documented lightweight Python framework that eases the process of building web applications. It has a variety of useful extendable features.
In this tutorial, we will learn how to write backend and frontend code for a simple blog website, practicing the following concepts as we do:
Learning Objectives
Set up and deploy a flask web app locally
Responsive Web Design using HTML, CSS & Jinja
Create Flask database models
Query objects in Flask SQLite database
Internet Security with Werkzeug
User authentication with flask bcrypt
Create functional routes/endpoints
Note: Everything here will be locally hosted. We will not be able to send a link to others for them to write and view articles on the blog. Yet, proper documentation will enable us to share this project with the world, as seen here See Full Code Repository
Prerequisites
To replicate this demo, you should have:
Basic knowledge of HTML, CSS and python
A pc/desktop with Python 3 (version 3 and above) installed
Any code editor installed. (The context of this article is Visual Code Studio (Vs Code )
Experience using the command line interface (Bash Terminal Shell: could be Git BASH, ZSH or similar)
Setting up Flask
Flask is a python-based microweb framework used in developing web applications. Unlike Django, flask does not have a lot of tools and libraries but is quite easy to work with, for small and medium-scale applications.
With the following steps, we will create a dedicated folder on the computer for our Flask project, and learn a thing or two about virtual environments as we do.
Create a Project Folder
It is good practice to have all files and folders properly organized on the system. For this blog project, we will create a dedicated folder on the computer. We can do this with the computer's file manager, VS Code or the terminal. Here's the terminal script to create a new directory (folder) and then move into it:
$ mkdir GBR-FLASKBLOG
$ cd GBR-FLASKBLOG
Set Up a Virtual Environment
Virtual environments keep installations and requirements unique to each project. It is recommended to create a new virtual environment for each project, as this prevents some compatibility issues and keeps things nicely organized. Virtual environments are easy to set up, using the venv a module that comes bundled with Python. Any name can be chosen for the virtual environment. We will use gbrblog in this tutorial.
We start by creating a virtual environment using the syntax below
python -m venv <venv name>
The next step is to activate our virtual environment with this command:
 <venv name>/Scripts/Activate (windows)  #or
 source/<venv name>/bin/activate(mac)
Once activated, the Command Line Interface (CLI) will change to show the virtual environment's name. We will ignore this in future code blocks on this tutorial because all we will need to type is what comes after the $ sign.
Install Flask
Pip is the package installer for Python. It is a very useful module that comes bundled with Python, so we will come across it often when installing Python libraries.
Within the activated environment, we will install Flask using this pip command:
$ pip install Flask
Freeze Dependencies into the 'requirements.txt' file
The 'requirements.txt' file keeps track of all the external packages installed in the course of the project, to enable the project to function properly when opened on another computer. Be sure to run the command after each subsequent installment, to update it.
run the syntax to pip freeze all packages:
pip freeze > requirements.txt
Creating a Flask App
We will first create a .flaskenv file within the home directory of the project, and type in the following settings for your development environment:
FLASK_ENV = DEVELOPMENT
FLASK_DEBUG = 1
FLASK_APP = app.py
# type 'pip install python-dotenv' in the terminal to run this file.
With these statements, we have told the computer that:
We want to run this Flask project on a development server
We are willing to debug the Flask app as it runs (1 is "True" in Boolean)
We want Flask to recognize
app.pyas the main Flask app file for this project
This brings us to app.py, eventually the heaviest file in this project. Note that it is better to split the code we will have in app.py into different Python files which carry out specific functions, but we are keeping things simple here.
Create app.py within the project's home directory, then write some code within:
from flask import Flask
app = Flask(__name__)
Defining Database Models
Database models are like table columns in which data from the blog will be stored. Database models are written in classes with fields that suit the type of data expected. For this blog app, we will be creating three different model classes for User data, Blog Articles, and Contact Information. We want to store the primary information of users who register with the app, to enable the user authentication feature.
SQLAlchemy is an SQL toolkit that provides efficient and high-performing database access for relational databases. It provides ways to interact with several database engines such as SQLite, MySQL, and PostgreSQL. It gives you access to the database’s SQL functionalities. It also gives you an Object Relational Mapper (ORM), which allows you to make queries and handle data using simple Python objects and methods.
Flask-SQLAlchemy is a Flask extension that makes using SQLAlchemy with Flask easier, providing you tools and methods to interact with your database in your Flask applications through SQLAlchemy."
We will first install Flask-SQLAlchemy with the following terminal code:
$ pip install Flask-SQLAlchemy
We will now return to app.py to import the inbuilt os module for configuration purposes, and the SQLAlchemy class for manipulating our database. Our Python file should look like this by now:
from flask import Flask
from flask_sqlalchemy import SQLAlchemy
import os

app = Flask(__name__)
In this step, we will construct a path for our SQLite database file. We will use some functions from the os module to store the path of the base directory in a variable named base_dir. We will then configure SQLAlchemy's URI and secret key, and turn off modification tracking to use less memory.
base_dir = os.path.dirname(os.path.realpath(__file__))

app.config["SQLALCHEMY_DATABASE_URI"] = 'sqlite:///' + \
    os.path.join(base_dir, 'site.db')
app.config["SQLALCHEMY_TRACK_MODIFICATIONS"] = False
app.config["SECRET_KEY"] = 'createacomplexsecretkeyhere'
This step can be a bit confusing and abstract, but we do not need to memorize the syntax. Just understand what it is doing, and then it can be modified for each future Flask project.
Note: The secret key is an important security feature. It is standard practice to create a complex hexadecimal string for each project and hide it from the public.
Lastly, We will create a database object using the SQLAlchemy class, passing the app instance to connect our Flask app with SQLAlchemy. We will store this database object in a variable called db. We will then use this db object to interact with our database.
db = SQLAlchemy(app)
db.init_app(app)
Create a models.py file, import the sqlalchemy instance from the db.py file, and define your models.
We can now build the User class using the following code:
# In the models.py file:
from db import db
# User model for the database.
# Stores dynamic information gotten from the register form in the columns defined
class User(db.Model, UserMixin):
    id = db.Column(db.Integer(), primary_key=True)
    firstname = db.Column(db.String(255), nullable=False)
    lastname = db.Column(db.String(255), nullable=False)
    email = db.Column(db.String(255), nullable=False, unique=True)
    password = db.Column(db.String(60), nullable=False)
    posts = db.relationship('Blogpost', backref='author', lazy=True)

    def __repr__(self):
        return f"User <{self.firstname}, {self.lastname}>"
The 'posts' column in the User model is to create a one-to-many database relationship with the model for blog posts because a user can make multiple blog posts, and enable the program to display the author for each blog post.
Other Models include the post model and the message model. The Post model creates a table of articles, links each article to its author, and then returns the article's title as its representation. The Message model creates a table of messages from site visitors and returns the message title as its representation. see the code syntax for the models in the model.py file.
Creating the Database
After defining all the models and app configurations in the app.py file, then it's time to create the database itself. To do this, open the terminal and follow these steps:
python
from app import app, db
with app.app_context():
# press the tab key, db.create_all()
# Hit enter twice
When we use flask run in the terminal, a site.db file will appear in the project's root directory if none previously existed. We can then use DB Browser for SQLite to see what is happening within the database, as VS Code does not read .db files.
Routing Design
Routing means mapping a URL to a specific Flask function that will handle the logic for that URL. The route() decorator in Flask is used to bind the URL to a function and the URL is passed as an argument into the decorator. We will use @app.route() in this tutorial.
we will need to add a few imports from Flask, leaving us with this statement for the Flask imports line, these imports will become clearer as we go through their use cases.
from flask import render_template, url_for, flash, redirect, request, abort
Let's look at the various route URLs we will be routed to:
Homepage
The index route is always represented with just
'/'in routing. Since this is the homepage of a blog, we will make anindex()function to display all posts.@app.route('/') def index(): articles = Post.query.all() context = { "post": post } return render_template('index.html', **context)About
This simple function renders the
about.htmltemplate as a webpage that tells the visitor about the blog site and its creator.@app.route('/about') def about(): return render_template('about.html')Contact
Our
contact()function collects feedback from users via a form in thecontact.htmltemplate, stores it on the"messages"table in the database using theMessagemodel, and then redirects to the homepage after flashing a success message.@app.route('/contact', methods=['GET', 'POST']) def contact(): if request.method == 'POST': sender = request.form.get('name') email = request.form.get('email') title = request.form.get('title') message = request.form.get('message') priority = request.form.get('priority') new_message = Message(sender=sender, email=email, title=title, message=message, priority=priority) db.session.add(new_message) db.session.commit() return redirect(url_for('contact')) return render_template('contact.html')Note: The
'GET'method gets data from the backend to display to users, while the'POST'method allows a user to post data to the backend.'GET'is the default routing method, so it does not need to be passed as an argument when no other method is used.We have now set up the basic backend code needed to get the blog up and running. We will soon write blocks of code that will manipulate the
UserandArticletables, but that would be after designing the user interface.
Frontend Templates
We will be including some frontend languages since we are building from the scratch. Here we will learn the standards for creating a templates folder in Flask, practice some HTML and CSS (you can add some javascript if there is a need to make the blog responsive).
Create a 'templates' folder for all the HTML files. Use template inheritance to avoid repetition on all the pages.
Create a 'static' folder for CSS files, images, and javascript if any. The Flask framework has been programmed to locate the files in this destination. Linking for CSS files or images in your templates should take this format:
<link href="{{ url_for('static', filename='<name of file>') }}" rel="stylesheet" type="text/css" />
Create HTML Templates
We start this step by creating a templates folder within the project's main folder or root directory. This folder is a standard in Flask development, as it is from here that all HTML files used in the project will be accessed by the Flask app. Check out the Template folder here.
We will then proceecreate these HTML files for the blog: home.html, layout.html, about.html, contact.html, register.html, login.html, create_post.html, user_post.html, account.html and post.html.
Jinja lets us make our HTML files dynamic with syntax that resembles Python. Jinja code is written where needed within the HTML code, so it is not stored as a separate script. Template inheritance allows you to build a base “skeleton” template that contains all the common elements of your site and defines blocks that child templates can override.
"Jinja is a fast, expressive, extensible templating engine. Special placeholders in the template allow writing code similar to Python syntax. Then the template is passed data to render the final document." -Jinja Docs
CSS Template
Just like the templates folder in the previous step, the static folder is a standard for frontend development with Flask. A Flask project's static folder contains all assets used by the project's templates, including CSS files, JavaScript files, and images. Within the static folder, we will create a css folder, which will then have our main.css file. For this beginner-friendly project, all styling will be done within main.css.
The choice of blog design within main.css is entirely up to the programmer. There are many ways of doing this - including the popular Bootstrap styling toolkit, but we will be using a simple vanilla CSS template for this blog.
With the basic frontend and backend code now covered, we will focus on the more specific functions that this blog site will be able to perform.
Note: As with previous sections of this tutorial, most of the syntax explanation for the next two major segments has been outsourced to more detailed online tutorials and official documentation, with sample code being available on GBRBLOG.
User Management
A major function of this blog will be handling users and their data. This involves user registration and authentication. We will explore the Python code used to achieve said objectives in this section of the tutorial. To see the HTML templates used in our sample project, check out register.html and login.html.
User authentication is simply a feature that allows users to register their information and log in to the app.
Create a forms.py file, and install flask_wtf (a package for creating forms in Flask)
Define form parameters for user login and registration. See the forms.py file.
Install Flask_bcrypt(for password authentication), and Flask_login(To manage user sessions)
In the app.py file, create the 'login', 'register' and 'logout' routes
Register a User
Our register() function collects user data from the registration form in the register.html template. If the username is already taken, we will flash an error and reload the registration page. If the given username is available, we will add this new user's data to the "users" table in the database with a hashed password, using the User model. We will then redirect them to the login page.
@app.route("/register", methods=['GET', 'POST'])
def register():
    if current_user.is_authenticated:
        return redirect(url_for('home'))
    form = RegistrationForm()
    if form.validate_on_submit():
        hashed_password = bcrypt.generate_password_hash(form.password.data).decode('utf-8')
        user = User(first_name=form.first_name.data, last_name=form.last_name.data, username=form.username.data, email=form.email.data, password=hashed_password)
        db.session.add(user)
        db.session.commit()
        flash('Your account has been created! You are now able to log in', 'success')
        return redirect(url_for('login'))
    return render_template('register.html', title='Register', form=form)
The Flask_login package also has a 'current_user' function that can be used to customise views for only authenticated users in the HTML template.
Log a User In
The login() function checks if the user's input on the login.html form matches any username and hashed password pair on the "users" table in the database. It then redirects to the homepage if the user is successfully authenticated, but flashes an error and reloads the login page if the data is invalid.
@app.route("/login", methods=['GET', 'POST'])
def login():
    if current_user.is_authenticated:
        return redirect(url_for('home'))
    form = LoginForm()
    if form.validate_on_submit():
        user = User.query.filter_by(email=form.email.data).first()
        if user and bcrypt.check_password_hash(user.password, form.password.data):
            login_user(user, remember=form.remember.data)
            next_page = request.args.get('next')
            return redirect(next_page) if next_page else redirect(url_for('home'))
        else:
            flash('Login Unsuccessful. Please check email and password', 'danger')
    return render_template('login.html', title='Login', form=form)
We have now achieved user authentication, only allowing those who provide the correct name and password to be logged into the blog.
Log Out the Current User
The Flask-Login module provides an easy logout_user() function, which helps us revoke a user's access to protected routes once they click the logout link:
@app.route("/logout")
def logout():
    logout_user()
    return redirect(url_for('home'))
No HTML template is needed here, as the route simply logs the user out and redirects them to the homepage.
Reset a User Password
@app.route("/reset_password", methods=['GET', 'POST'])
def reset_request():
    if current_user.is_authenticated:
        return redirect(url_for('home'))
    form = RequestResetForm()
    if form.validate_on_submit():
        user = User.query.filter_by(email=form.email.data).first()
        # send_reset_email(user)
        flash('An email has been sent with instructions to reset your password.', 'info')
        return redirect(url_for('login'))
    return render_template('reset_request.html', title='Reset Password', form=form)
RequestResetForm, ResetPasswordForm are Flask imports that helps with password rest and password token generation.
@app.route("/reset_password/<token>", methods=['GET', 'POST'])
def reset_token(token):
    if current_user.is_authenticated:
        return redirect(url_for('home'))
    user = User.verify_reset_token(token)
    if user is None:
        flash('That is an invalid or expired token', 'warning')
        return redirect(url_for('reset_request'))
    form = ResetPasswordForm()
    if form.validate_on_submit():
        hashed_password = bcrypt.generate_password_hash(form.password.data).decode('utf-8')
        user.password = hashed_password
        db.session.commit()
        flash('Your password has been updated! You are now able to log in', 'success')
        return redirect(url_for('login'))
    return render_template('reset_token.html', title='Reset Password', form=form)
Blog Posts Management
Another major feature of our blog will be handling articles on the site. This involves user authorization, as some features and routes should only be available to the author of the article. To see the relevant HTML templates used in our sample project, check out post.html, create_post.html and user_post.html on GBRBLOG.
Creating a blog Post
A user has to be logged in to be able to post an article, as some user data is required to identify the author and later authorize them to edit or delete their articles. Only user authentication (not authorization) is needed for this step, as the protected data (article) doesn't exist until it has been created.
Create a WTForm class for the blog post in the forms.py file
Import the form class to the app.py and define the create_post route
@app.route("/post/new", methods=['GET', 'POST'])
@login_required
def new_post():
    form = PostForm()
    if form.validate_on_submit():
        post = Post(title=form.title.data, content=form.content.data, author=current_user)
        db.session.add(post)
        db.session.commit()
        flash('Your post has been created!', 'success')
        return redirect(url_for('home'))
    return render_template('create_post.html', title='New Post',
                           form=form, legend='New Post')
Editing a Blog Post
To give the app users a better experience, there should be an option for the post author to edit the post, in case of grammatical errors or wrong information. Just like the delete function, it should be restricted to posts made by the user. Here's an implementation for this feature:
@app.route("/post/<int:post_id>/update", methods=['GET', 'POST'])
@login_required
def update_post(post_id):
    post = Post.query.get_or_404(post_id)
    if post.author != current_user:
        abort(403)
    form = PostForm()
    if form.validate_on_submit():
        post.title = form.title.data
        post.content = form.content.data
        db.session.commit()
        flash('Your post has been updated!', 'success')
        return redirect(url_for('post', post_id=post.id))
    elif request.method == 'GET':
        form.title.data = post.title
        form.content.data = post.content
    return render_template('create_post.html', title='Update Post',
                           form=form, legend='Update Post')
Deleting a Blog Post
The delete function is quite straightforward. Note that users should only be able to delete posts made by them. Deletion does not need an HTML file, as it is a route which does one action and then redirects home. Our delete(id) function enables article deletion from the database by that article's author only. Just as above, the function first queries the database for the entry whose ID matches the article ID it has received as an argument, then it checks if the current user is the author of the chosen article before executing the db.session.delete() function. We will then redirect to the homepage when the article is successfully deleted, or flash an error and redirect home if the user is unauthorized.
@app.route("/post/<int:post_id>/delete", methods=['POST'])
@login_required
def delete_post(post_id):
    post = Post.query.get_or_404(post_id)
    if post.author != current_user:
        abort(403)
    db.session.delete(post)
    db.session.commit()
    flash('Your post has been deleted!', 'success')
    return redirect(url_for('home'))
We have completed this project by designing our blog site and adding all desired features with clean code. Hurray!!.
Summary
If you are thinking of cool projects to add to your portfolio, a blog app could be one. This blog post demonstrated how to build a blog app using the Flask framework, and basic front-end technologies. Here is an example of how GBRBLOG looks on the homepage:
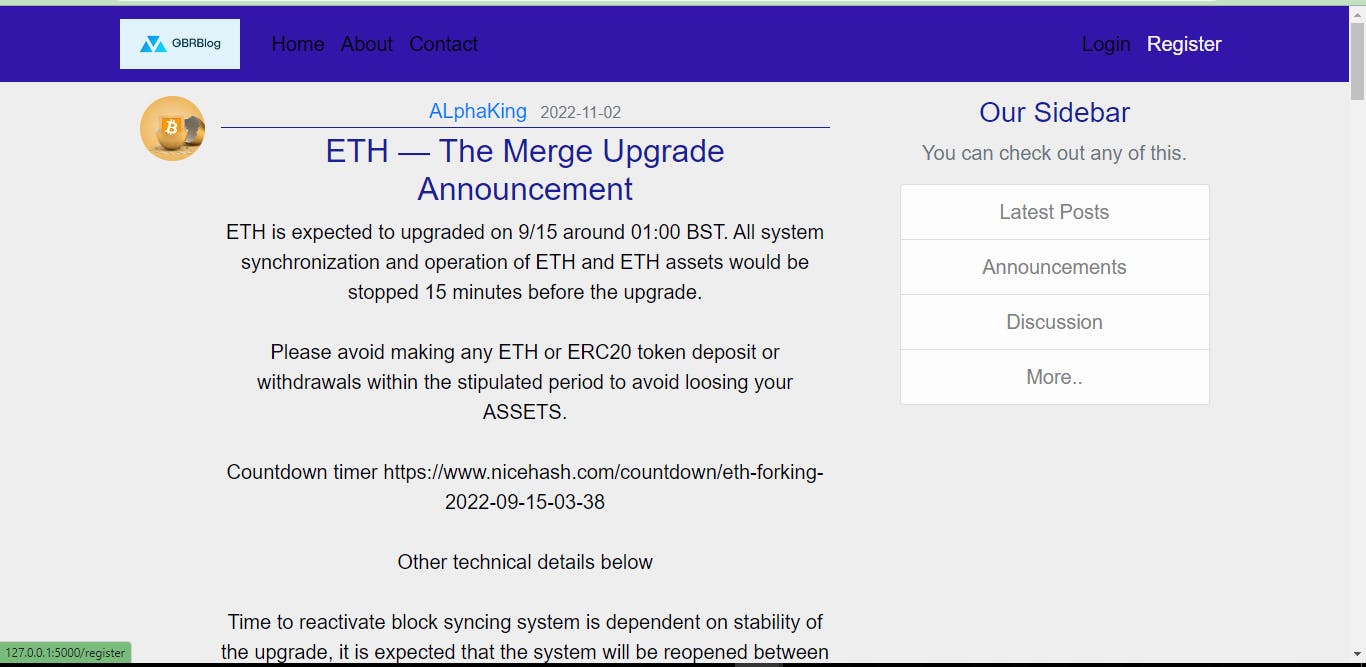
Additional features added in this blog includes Profile Pictures of Users, Pagination, User Email reset, Password reset from email verification and many more. you can still add more interesting features in your own blog.
Conclusion
This article covers how to set up a Flask environment in VS Code, manipulate HTML templates with Jinja, and perform CRUD operations on a database with SQLite and SQLAlchemy. We have also practiced responsive web design with HTML and CSS, routing, password hashing with Werkzeug, message flashing, internet security, user authentication and user authorization.
I hope this post was helpful, please share your comments below☺